This is my first attempt at doing a makeup tutorial. This a traditional, high-contrast Gothic look, suitable to be worn with various styles, or at least I do similar makeup with various outfits. Probably a bit heavy to wear with particularly historical outfits or Lolita inspired outfits, but with a bit of added neon it could form the basis of a cyber look. I tend not to wear false eyelashes unless out clubbing, so there's no instructions on that.
First of all, pluck/wax. I have dark, thick hair. My eyebrows grow back insanely fast, I have finer brown-ish hair on my upper lip that gets waxed, and coarse black hairs and coarse red (there aren't any redheads in my family, so I'm not sure how this happened) grow out my chin, and those get plucked. I have practically no eyebrows, those also get plucked. I use a thin line of natural hairs as a guide for fancier drawn ones. Some people like to wax/pluck after washing their face, but I think washing my face afterwards helps soothe any soreness.
Secondly, wash your face. This gets rid of flaky bits and helps reduce oily patches that can make your foundation go strange while wearing. If you had eye-makeup on the previous day, give your eyes an extra clean with some eye-makeup remover, because you don't want any mascara or eyeliner residue getting dragged into your foundation.
I am rather pale and slightly ruddy with dry skin, so I'd normally moisturise with a moisturiser that includes some sun protection. I am a sunscreen in winter sort of person, I burn and then develop freckles in sunlight, and my freckles like turning into moles, so I try my best to avoid that. I have three brown moles on my cheek, and a pink 3D one that sprouts hairs under my lip. My nose tends towards being oily, the rest of my face is really dry. I do not understand this strange quality of my nose! Once moisturised, use primer that turns your face into a nice blank, smooth canvas for makeup. My primer is sadly still in the bathroom back in England. Oops.
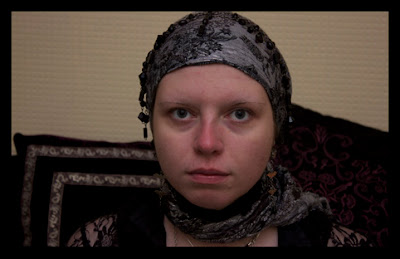 |
| Wash, moisturise, prime. |
This is me having washed my face and done the above steps. You can actually see the pink on my nose where the skin changes and tends towards being oily! I have a scarf on my head because I couldn't find the box with all my hairbands in, and wanted to keep my hair out of my eyes.
The next step is to conceal blemishes and on your lips, then apply foundation. I use a porcelain and white, and blend them on my face rather than the back of my hand because my hands are ruddier than my face. This is not making my face much paler than it is, but does take out a lot of the pink/red tones, especially on my nose. I deliberately got my partner to take a photo of only half of my face done to show the change and to show the two foundations on my face. I tend to use more white in the foundation around my eyes because it contrasts with the black and provides extra vibrancy when I'm wearing colours.
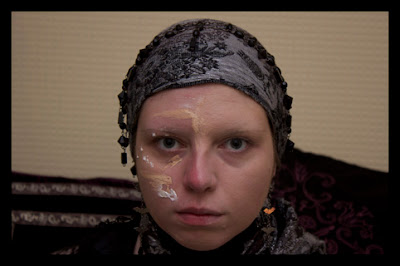 |
| Apply foundation. |
Make sure to blend your foundation really well, onto your ears, down your neck and into your hairline. There was re-adjustment of that scarf between this photo and the next. After primer, foundation is exactly what it is - the foundation of your makeup, so you want to get this bit right. Don't go too pale unless you're well practised and covering all exposed skin.
Next powder your face for a good finish, and highlight the tops of your cheek bones and rim of your eye-socket. I then used some shimmer powder on the cheek highlights and went under my eyebrow with slightly pearlescent white eyeshadow. The white eyeshadow is for contrast later. I do the highlights with a brush. I'm using large, soft watercolour brushes (and cleaning them well afterwards!) to do this because my proper makeup brushes also got left behind. Oops. I'm not using my art brushes for any cream, liquid, or other non-powder makeups because I want to use those brushes for art sometime, and I'm using them from new, they were cheap ones I bought in Hobby Craft or something. If they've had paint on them, I wouldn't advise using art brushes near your eyes.
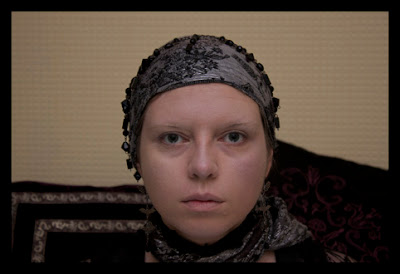 |
| Powder your face |
The next stage is the lips. Line them in black. The concealer applied earlier gives a neat edge to the lip makeup, and lining the lips first helps stop the lipstick from spreading. Use a decent black lipstick, not halloween makeup. I do mine in a first coat which I blot thoroughly, wait until it has set, then do a second coat and blot that, and then use lipstick sealer because with dark shades like black it shows and looks awful if it starts coming off.
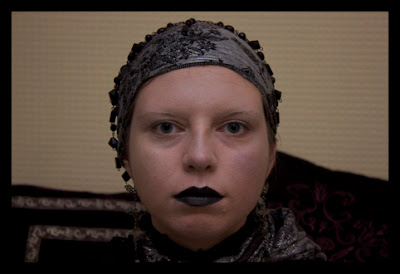 |
| Line, colour and seal your lips. |
The next stage is the eye makeup. As this isn't straightforward for me to explain in text, this has several photographs. The first stage is kohl under the lower lashes. I put kohl about two-thirds of the way to my nose and then blur it downwards and outwards for a smokey look. Don't do the lower waterline with kohl. It might take a couple of layers to get it smokey enough. I use kohl rather than eye shadow powder to avoid bits falling on my cheeks. If you want to, you can contour your cheek-bones with contouring powder at this point. Doing it very dramatically with angular lines is very 1980s, but I prefer a softer look.
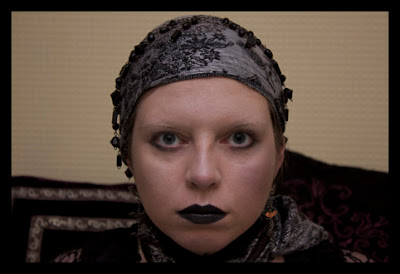 |
| Apply smokey kohl under the eyes |
The next step is to line your eyes in a cat-eye style with liquid liner at the top and outiside corners of your eyes. I use liquid liner by Rimmel as it has a really good application tip on the bottle and is les cumbersome than painting it on. Once that is done, use white pencil on your lower waterline to make your eyes look wider in order to counter-act the effect of wearing such dark makeup. I put a bit of white eye pencil on the inner corner of the eye, too. I think I actually did a tad too much this shot, so in the subsequent ones I'd blended it out as it looked a little strange.
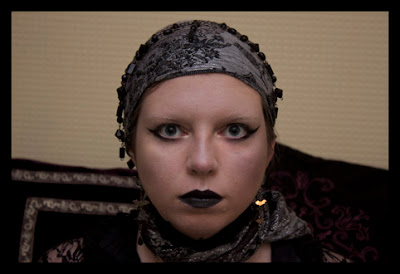 |
| Apply liquid liner and white eye pencil. |
The next stage I should have taken more photos, really, but I will have to do my best to explain in words. I used three eyes-shadows for this, the white, a silver and a black. For this I used a double-ended applicator and my highlighting brush. With the black I used a brush to go along the top of the eye-liner, and then using one side of the sponge tip, put black into the corners of the upper lid near my nose,. Then, using the other side of the sponge tip, I put silver up to the crease, and then using the first brush, not the one I used for the black, but the brush I used to do the highlights at the start, I put a new layer of white at the top, and then carefully blend it into a nice gradient. I'm a big fan of nice gradients. Once that is done, I pencil in my eye-brows. You can do them any shape you like. I'm thinking of doing something a bit squarer next time, as the curve meets up too smoothly with black eyeshadow here. Once that's done I do one last coat of eye-liner, for a crisp edge against the silver, and apply mascara. The "derp" face as my partner calls it, is so you can see the makeup, not because I was mucking around and pulling faces at the camera.
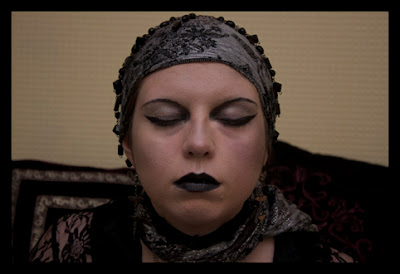 |
| Apply eye-shadow and pencil in eyebrows. |
There you have it! While this process has quite a few stages, I don't think it's a very complicated look to actually do. The only tricky stages are blending the foundation properly and drawing the eye-liner straight.
 |
| Some different angles |
I'd like to thank my partner very much for putting up with me typing this blog, and for taking all the photographs. I know our bedroom has hardly got ideal lighting conditions, but I think he did a fairly good job, and I'm not exactly the best model (I do a lot of "derp" faces and blink, and twitch...). My partner is semi-professional and has a ::website::.
If anyone is interested in what I used, here's a tray with most of the supplies in. Everyone has their own favourite products that work best for them and their skin, so I see little point in listing all my materials. (except to say that Rimmel eyeliner is very good for the price). I haven't put the preliminary stuff on the tray, as that gets done in the bathroom. That cute little gothic stained glass mirror was a find from Oxfam. Charity shops are one of the best concepts ever.
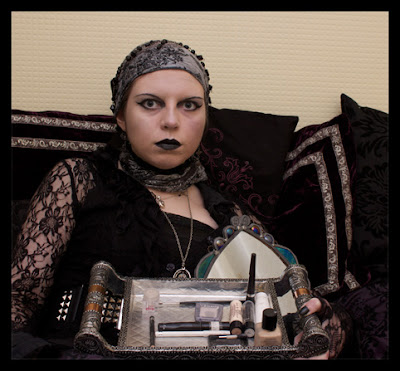 |
| Me with a tray full of goodies. |


first tutorial? thats good! and your eyes look so scary in the end, me likes!
ReplyDeleteBUT why did you have to tell it was in your bedroom, now i am staring at your pillows and want to buy some more for my bed, too XD feel like a shopping addict now!
Thanks :) I was hoping it was clear and that I'd explained it well. Hopefully I'll get better at making them easier to follow as I get more experienced at doing tutorials and as I read and watch more of others'.
DeleteI only said that about it being the bedroom because I thought that otherwise people would think it strange that there were cushions in my bathroom or somesuch. Oops. Well, some of the flock cushions are from The Range, but most of them are from charity shops, and they were quite reasonably priced, if that's any help. I'm a cushion addict, we can start a support group for this :P
Lovely, simple and dark. Everything a makeup look should be! Excellent, detailed tutorial. And I, too, covet your cushions (umm, that sounds wrong...)! :)
ReplyDeleteThankyou :) I'm happy the tutorial is detailed enough - this is the first time I've tried writing one, and I'm hoping people can follow it if they want to.
DeleteAt this rate I'm going to end up doing a post on cushions and being really house-wifey about it :P