My personal blog as a 'grown-up' Goth and Romantic living in the Highlands of Scotland. I write about the places I go, the things I see and my thoughts on life as a Goth and the subculture, and things in the broader realm of the Gothic and darkly Romantic. Sometimes I write about music I like and sometimes I review things. This blog often includes architectural photography, graveyards and other images from the darker side of life.

Goth is not just about imitating each other, it is a creative movement and subculture that grew out of post-punk and is based on seeing beauty in the dark places of the world, the expression of that in Goth rock. It looks back to the various ways throughout history in which people have confronted and explored the macabre, the dark and the taboo, and as such I'm going to post about more than the just the standards of the subculture (Siouxsie, Sisters of Mercy, Bauhaus, et al) and look at things by people who might not consider themselves anything to do with the subculture, but have eyes for the dark places. The Gothic should not be limited by what is already within it; inspiration comes from all places, the key is to look with open eyes, listen carefully and think with an open mind..

Showing posts with label eyeliner. Show all posts

Saturday, 2 May 2015

Gothic Eye Make-Up: Architecturally Gothic

Medieval Gothic art - and especially Gothic architecture - is the deep tap-root of Goth; it is from the old Gothic architecture of castles and abbeys that formed the settings of the early supernatural horror novels that the term "Gothic" was applied to them, and from those novels that the idea of Gothic meaning things that are dark, supernaturally spooky, atmospheric, and a mixture of darkness, the sublime and the terrible - and it is from that meaning, combined with the (broadly inaccurate) idea of the Germanic Goths being barbarians that the term "Goth" was applied to the fans of the music that would later also be called "Goth". 


As such, I decided it would be interesting to take direct influence from this for my makeup. Over the eyelid are three arches of increasing size with marble-painted smaller arches within them. The eyebrows and above them have tracery based on Gothic windows with pinnacles, crockets and and trifoliate designs. Under the eyes are two "clock-hand" inspired designs drawn to balance the upwards designs above the eye. 


This is my first attempt at drawing anything based on Gothic art and architecture actually ON my face, and I found it really hard to draw over the contours of my skin, and to draw with any accuracy in a mirror and where I could not rest my hand on anything to steady it. With the eyelids I used primer instead of foundation as the basis and then did a gradient of silver and pewter eyeshadow, then drew over that in eyeliner (using a narrow brush and a broader brush), then filled in the details with a silver eyeliner pen. The marble-painted sections were painted using water and powder eyeshadows and a water-colour brush (one assigned exclusively for use with make-up!). 


I would really love advice on how to do something like this more neatly. I'm quite happy with how it already turned out, but I would prefer to make it neater and have more accurately architectural details, and arches that look much pointier. As I mentioned before, I found actually drawing over my eyelids very difficult. The organic forms of my swirlies are more flowing and this easier to paint across an uneven surface, and are often drawn over the bony parts of my face, so are easier to draw. The hardest thing I find is lacking a way of bracing my arm so I can have a steadier hand. 

Sunday, 15 March 2015

Mermaid Make-Up

Today I experimented with colourful make-up. 
A very short post today!

I'm usually the sort of person that opts for very monochrome eye-makeup, but today I tried doing some make-up to match the colours in my hair. My hair is currently a darker gradient than before, with Directions Apple Green at the top, Stargazer Turquoise in the middle, and Directions Alpine Green for the back and bottom of my hair.

Not the best selfies. Photos by HouseCAT

For extra vibrant eyeshadow colours, I mask off under my eyes with bandage/dressing tape (being careful not to press too hard, otherwise it sticks fast and hurts a lot to pull off!) and then masking from the outer corners of my eyes to the outer ends of my eyebrows. I then cover the whole eyelid area right up to my brows in white foundation. The white foundation gives the eyeshadow something to stick to in order to last longer, and acts as a white ground to enhance vibrancy (something I learnt from Pre-Raphaelite painting techniques!). The masking using bandage/dressing tape also creates very clean, crisps edges. Really be careful not to stick it down too hard though, otherwise it really does tug at your skin to remove it (and as I have particularly stretchy skin, this is not fun!).

The finished effect reminded me of mermaids and ocean colours. Traditionally, mermaids are not always nice creatures, at least not in British mythology, where they're often a bad omen, or want to drown sailors - a bit like sirens - and are often associated with the weather turning nasty (this is Britain; the weather does that a lot, so perhaps we are overrun with mermaids? :P ). In Scottish mythology, there's a mermaid that's woman for the top section, and salmon for the bottom section, called a Ceasg or 
Maighdean Mhara that is a bit more benevolent, and she will grant three wishes to whomever catches her.

The photographs were taken on my webcam, and are not the best quality and are a bit hazy. They were also really quite dark despite it being a bright day, so I had to artificially lighten them in PicMonkey, so apologise if I look a bit paler than normal and a bit digital. The resolution wasn't good to begin with, and using tools that aren't meant as dodge and burn for those purposes in PicMonkey sort of smudged me further. 

Tuesday, 2 October 2012

The Synthetic Aesthetic & Hypocrisy

Recently, Amy of ::Stripy Tights and Dark Delights:: wrote ::this:: post on Goths that denigrate people of a certain popular aesthetic (Essex Girl in the UK, Jersey Shore to an American, I would guess that a lot of places have their equivalent) for being "fake" because of the fake tan, fake eyelashes, bleached hair, fake nails, hair extensions, heavy makeup, bust augmentations, etc. etc. I am probably repeating what she said here, but it is an important message, so I feel like reiterating it in my own words on this blog 

A lot of Goths and other Alternative types are just as "fake". I certainly go around with a corseted waist, a wig, fake eyelashes, heavy makeup, a pallor that is partly nature and partly makeup (more to even it out than make me paler), high heels, piercings etc. My waist is not naturally that thin, my hair is is not actually red (not even by dye), my eyelashes are pretty long, but they don't come with feathers, and I got all those jewellery-attachment-points through having someone poke holes through me! I go to great lengths to achieve a particular aesthetic, and that is all that these 'Essex Girls' are doing. There are people who have had far more extensive body mods than me; more piercings, elaborate tattoos, and even fangs, pointed ears and horns, all in search of a particular aesthetic. This is certainly a synthetic aesthetic, one that is created through artistry overlaid on nature. 

Usually someone comes in with the justification of something akin to 'oh, but they are following a trend, to them it's about fitting in and appealing to men and getting attention, they must be really insecure! We do it in the pursuit of our own personal aesthetic!' 

Who are we to judge? 

Unless you know someone well enough to have good estimation of their real motivations, you have no business judging someone. It is the same sort of prejudicial assumption as when mainstream people assume that we dress and look the way we do for attention or to rebel against our parents or to opt out of decent society. Considering the time and money and effort spent on a lot of these women's looks, I would say that there has to be a significant proportion who really are chasing their dream aesthetic. Yes, there certainly are those who follow that aesthetic to be trendy, to get attention, to impress men, because they are insecure with who they are under the fakery, etc. but there are also people who co-opt the Goth aesthetic in order to get attention, to impress men, to be rebellious, to try and shock people, because they are insecure with who they are under the fakery, etc. It is unfair to judge a group by the action of individuals who are not necessarily representative. It is easier to distinguish a Goth from someone co-opting the aesthetic, because there is some broader definition of Goth, but the 'Essex Girl' aesthetic is just an aesthetic (the party animal lifestyle, drinking, etc. are not inherent; plenty of people who don't follow this look behave like that, and not all who follow this look behave like that); there is no co-opting it away from a broader subculture. 

Basically, this is an encouragement not to judge; instead take people on their individual merit, on their own actions and behaviour. How somebody looks is not necessarily and indicator of what they are like, as we should all well know. A dose of humility and an open mind are good things to have. 

Thursday, 5 July 2012

Makeup Tutorial: Foliate Swirls

I see a lot of babybat goths with just a heap of black eyeliner and then some incoherent squiggles at the corner, and it seems that a lot of people think this is the limit to swirly eyeliner designs, and that they cannot ever look good. Personally, I think that it is possible to have swirls that look good. This tutorial was actually based on a request by Raven (not my partner, a different Raven) commenting on ::this post::. It is not the same makeup as worn in that post, but hopefully it will be helpful, and I will also do a complete tutorial for that look (with variant swirls; I can't exactly replicate them) at a later point.

You will need:
✥Primer and foundation to match your skin tone
✥Matt white eyeshadow
✥Black soft kohl pencil
✥Felt-tipped eyeliner pen
✥Silver liquid eyeliner
✥Metallic silver eyeshadow
✥Metallic pewter eyeshadow
✥Black eyeshadow.
✥Brush-tipped liquid liner.

Apply primer and foundation.
The first step is to prime and apply foundation. As this design itself is quite heavy, I have applied primer and a very sparing amount of foundation under my eyes to act as concealer, and a tad of actual concealer over the worst of the bags under my eyes. Too much foundation and heavy looks can appear caked. I'm relatively pale naturally, and am using tinted primer and foundation that approximately match my skin tone. If you look very carefully at the roots of my eyebrows, you can see where some has clumped and that it's actually a tad yellower than my actual skin tone. Don't forget to set the nose and the rest of the face with powder, but don't set the foundation around the eyes.
Apply matt white eyeshadow.
The next step is to add some strong matt white eye-shadow under the brow line, and then to dust some lightly across the cheeks and above the brow line, forming a 'C' shape around the outside of the eye on the bony parts of the face. This is basically for the purpose of highlighting the contours and to contrast better against the black that will be added later in this look. I use a matt white at this point because a shimmer or pearlescent white would have the wrong lustre for the highlights.
Add kohl under the eye.
The third stage is creating a shadowy effect under the eye. Firstly line below the lashes with a soft, smudgy kohl pencil, then with either a cotton-bud (q-tip) or the edge of your little finger, smudge the kohl outwards and downwards. Try to get it to fade out smoothly. Be careful at the point where you meet with the upper lid not to get black on the outward continuation of the crease of the upper lid. Afterwards, take a felt-tipped black eyeliner pen (NOT a felt-tip pen!) and go over the kohl right up against the lashes. Emphasises the extension of the upper lid's crease by drawing in the downward curve with the same liner. You want to be drawing in the crease, below the upper lid. The idea is to give the illusion of a longer upper lid and therefore longer eye.
Apply and blend eyeshadows.
This stage is most fun! First of all cover the upper lid up to the crease formed by the curvature of the eyeball with liquid silver eyeliner. You want to pick a really metallic shade. I have gone over this with Rimmel metallic silver eyeshadow and then metallic pewter eyeshadow in the corner in order to set the liquid eyeshadow. Draw in the crease with the kohl pencil, and dab over it with black eyeshadow to set. Apply the pewter eyeshadow between the white from earlier and the black. Using a narrow but fluffy-ish brush, blend the outwards to the brow from the black. Begin pencilling in the eyebrow.
Add swirls and line upper lid.
The next step is fun when you get the hang of it, but requires practice. Take a liquid eyeliner with a brush tip and line the upper lid narrowly over the silver and draw in your swirls. Practice drawing swirls before going out with this. If you use a a brush-tipped liner you can get a variation in width of line when you change the angle. End a few of the lines with tapering ends, or with curls that form dots, practice drawing stylised leaves. I tend to have the swirls emerge from the lower lid line and the extension of the corner, and then have one emerging at the end of the crease following the curve of the lower lid. These swirls are going to have silver on them in the next step so I have included a few broad sections that look a little odd at this stage. You can stop at this stage if you want a sharper, more minimal set of swirls (my personal preference), or go onto the next for an extra level of fanciness. 
And there, you're done!
The last stage is adding the silver highlights on the black swirls in silver liner. If it bleeds out onto the black, then just line around it again carefully in more black. Just add small sections of silver on the broadest parts of the black swirls. I also added some dots in black liquid liner below the brow and tidied up the drawing in of the brow. I then applied white eyeliner to my lower waterline and applied mascara to both lower and upper lashes. Then you're done! Swirls with silver and snazzy metallic eyeshadow. 

Big hugs and huge thanks to my partner Raven for taking all of the photographs. Hopefully they illustrated all the stages clearly. Raven did a fantastic job considering that I am terrible at being a makeup model on account of being terribly inclined to blink when lights are pointed at my eyes. I did all of the post-processing because it was Raven's turn to cook dinner tonight and I did not want to distract him. 

Wednesday, 28 December 2011

Makeup Tutorial: Black Lips and Eye-Makeup


This is my first attempt at doing a makeup tutorial. This a traditional, high-contrast Gothic look, suitable to be worn with various styles, or at least I do similar makeup with various outfits. Probably a bit heavy to wear with particularly historical outfits or Lolita inspired outfits, but with a bit of added neon it could form the basis of a cyber look. I tend not to wear false eyelashes unless out clubbing, so there's no instructions on that.

First of all, pluck/wax. I have dark, thick hair. My eyebrows grow back insanely fast, I have finer brown-ish hair on my upper lip that gets waxed, and coarse black hairs and coarse red (there aren't any redheads in my family, so I'm not sure how this happened) grow out my chin, and those get plucked. I have practically no eyebrows, those also get plucked. I use a thin line of natural hairs as a guide for fancier drawn ones. Some people like to wax/pluck after washing their face, but I think washing my face afterwards helps soothe any soreness.

Secondly, wash your face. This gets rid of flaky bits and helps reduce oily patches that can make your foundation go strange while wearing. If you had eye-makeup on the previous day, give your eyes an extra clean with some eye-makeup remover, because you don't want any mascara or eyeliner residue getting dragged into your foundation.

I am rather pale and slightly ruddy with dry skin, so I'd normally moisturise with a moisturiser that includes some sun protection. I am a sunscreen in winter sort of person, I burn and then develop freckles in sunlight, and my freckles like turning into moles, so I try my best to avoid that. I have three brown moles on my cheek, and a pink 3D one that sprouts hairs under my lip. My nose tends towards being oily, the rest of my face is really dry. I do not understand this strange quality of my nose! Once moisturised, use primer that turns your face into a nice blank, smooth canvas for makeup. My primer is sadly still in the bathroom back in England. Oops. 
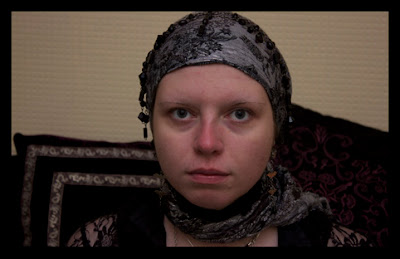
Wash, moisturise, prime.

This is me having washed my face and done the above steps. You can actually see the pink on my nose where the skin changes and tends towards being oily! I have a scarf on my head because I couldn't find the box with all my hairbands in, and wanted to keep my hair out of my eyes.

The next step is to conceal blemishes and on your lips, then apply foundation. I use a porcelain and white, and blend them on my face rather than the back of my hand because my hands are ruddier than my face. This is not making my face much paler than it is, but does take out a lot of the pink/red tones, especially on my nose. I deliberately got my partner to take a photo of only half of my face done to show the change and to show the two foundations on my face. I tend to use more white in the foundation around my eyes because it contrasts with the black and provides extra vibrancy when I'm wearing colours.
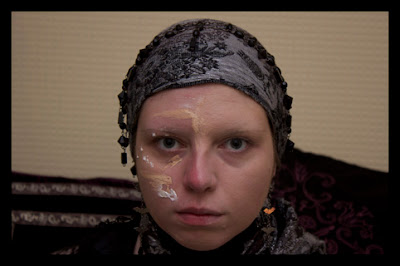
Apply foundation.
Make sure to blend your foundation really well, onto your ears, down your neck and into your hairline. There was re-adjustment of that scarf between this photo and the next. After primer, foundation is exactly what it is - the foundation of your makeup, so you want to get this bit right. Don't go too pale unless you're well practised and covering all exposed skin. 

Next powder your face for a good finish, and highlight the tops of your cheek bones and rim of your eye-socket. I then used some shimmer powder on the cheek highlights and went under my eyebrow with slightly pearlescent white eyeshadow. The white eyeshadow is for contrast later. I do the highlights with a brush. I'm using large, soft watercolour brushes (and cleaning them well afterwards!) to do this because my proper makeup brushes also got left behind. Oops. I'm not using my art brushes for any cream, liquid, or other non-powder makeups because I want to use those brushes for art sometime, and I'm using them from new, they were cheap ones I bought in Hobby Craft or something. If they've had paint on them, I wouldn't advise using art brushes near your eyes. 
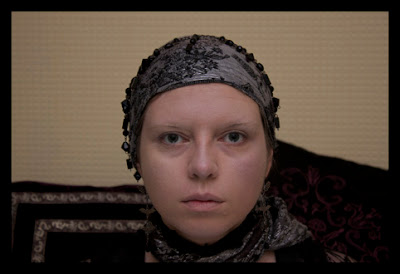
Powder your face
The next stage is the lips. Line them in black. The concealer applied earlier gives a neat edge to the lip makeup, and lining the lips first helps stop the lipstick from spreading. Use a decent black lipstick, not halloween makeup. I do mine in a first coat which I blot thoroughly, wait until it has set, then do a second coat and blot that, and then use lipstick sealer because with dark shades like black it shows and looks awful if it starts coming off. 
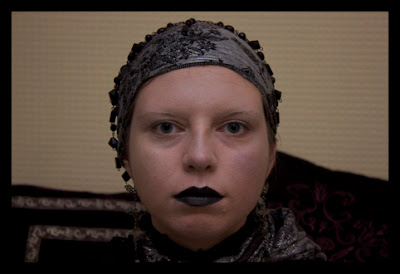
Line, colour and seal your lips.
The next stage is the eye makeup. As this isn't straightforward for me to explain in text, this has several photographs. The first stage is kohl under the lower lashes. I put kohl about two-thirds of the way to my nose and then blur it downwards and outwards for a smokey look. Don't do the lower waterline with kohl. It might take a couple of layers to get it smokey enough. I use kohl rather than eye shadow powder to avoid bits falling on my cheeks. If you want to, you can contour your cheek-bones with contouring powder at this point. Doing it very dramatically with angular lines is very 1980s, but I prefer a softer look. 
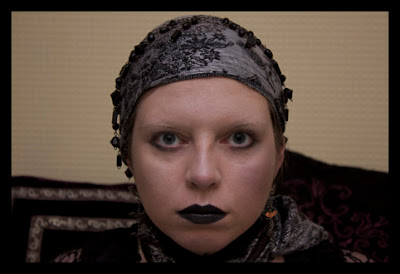
Apply smokey kohl under the eyes
The next step is to line your eyes in a cat-eye style with liquid liner at the top and outiside corners of your eyes. I use liquid liner by Rimmel as it has a really good application tip on the bottle and is les cumbersome than painting it on. Once that is done, use white pencil on your lower waterline to make your eyes look wider in order to counter-act the effect of wearing such dark makeup. I put a bit of white eye pencil on the inner corner of the eye, too. I think I actually did a tad too much this shot, so in the subsequent ones I'd blended it out as it looked a little strange. 
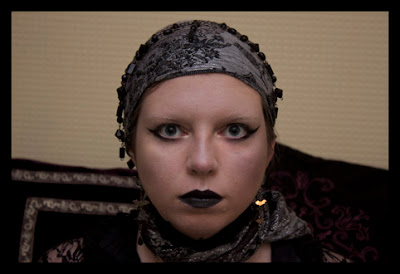
Apply liquid liner and white eye pencil.
The next stage I should have taken more photos, really, but I will have to do my best to explain in words.   I used three eyes-shadows for this, the white, a silver and a black. For this I used a double-ended applicator and my highlighting brush.  With the black I used a brush to go along the top of the eye-liner, and then using one side of the sponge tip, put black into the corners of the upper lid near my nose,. Then, using the other side of the sponge tip, I put silver up to the crease, and then using the first brush, not the one I used for the black, but the brush I used to do the highlights at the start, I put a new layer of white at the top, and then carefully blend it into a nice gradient. I'm a big fan of nice gradients. Once that is done, I pencil in my eye-brows. You can do them any shape you like. I'm thinking of doing something a bit squarer next time, as the curve meets up too smoothly with black eyeshadow here. Once that's done I do one last coat of eye-liner, for a crisp edge against the silver, and apply mascara. The "derp" face as my partner calls it, is so you can see the makeup, not because I was mucking around and pulling faces at the camera. 
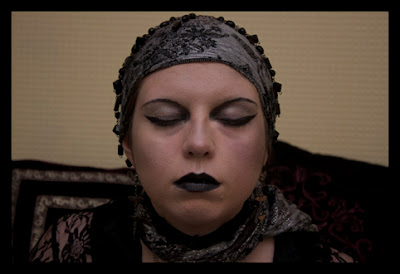
Apply eye-shadow and pencil in eyebrows.
There you have it! While this process has quite a few stages, I don't think it's a very complicated look to actually do. The only tricky stages are blending the foundation properly and drawing the eye-liner straight. 

Some different angles

I'd like to thank my partner very much for putting up with me typing this blog, and for taking all the photographs. I know our bedroom has hardly got ideal lighting conditions, but I think he did a fairly good job, and I'm not exactly the best model (I do a lot of "derp" faces and blink, and twitch...). My partner is semi-professional and has a ::website::

If anyone is interested in what I used, here's a tray with most of the supplies in. Everyone has their own favourite products that work best for them and their skin, so I see little point in listing all my materials. (except to say that Rimmel eyeliner is very good for the price).  I haven't put the preliminary stuff on the tray, as that gets done in the bathroom. That cute little gothic stained glass mirror was a find from Oxfam. Charity shops are one of the best concepts ever. 
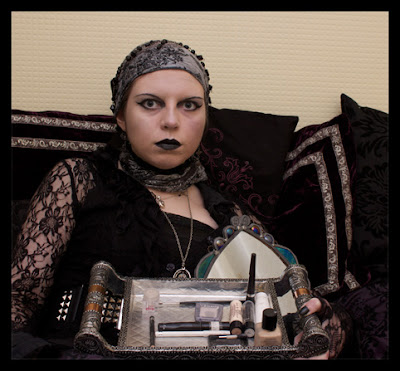
Me with a tray full of goodies.